Showing posts with label 甜點Dessert. Show all posts

2014-11-19

茉莉花茶香吐司(湯種 超鬆軟麵包)Jasmine Tea Bread (Sweet & Soft)

Facebook Fan Page 同步發放  www.facebook.com/cindykitchenmeowmeow

茶是一種芳香飲品,是世界上應用最為廣泛的飲料。原來,茶樹是原產於東亞和南亞。它起源於中國的藥用飲料
Tea is a popular aromatic drink and the most widely consumed beverage in the world. It is originated in China as a medicinal drink. Tea was first introduced to Portuguese priests and merchants in China during the 16th century, at which time it was termed chá  茶
Tea plants are native to East and South Asia. 

CINDY Meow Meow 每日都會喝一杯 茉莉花茶(香片)  “茉莉花茶”是用綠茶做的,但也可以用烏龍茶製成。
茉莉花茶提供了許多健康益處:包括 降低癌症的風險,降低血壓、中風風險和降低膽固醇水平。茉莉花茶更含有高濃度的抗氧化劑。
CINDY Meow Meow enjoys a cup of Jasmine tea everyday.  "Jasmine Tea" is made using green tea most often, but can also be made from Oolong tea. 
Jasmine tea offers many health benefits:  including a reduced risk of cancer, lower blood pressure, stroke and cholesterol levels.  Jasmine tea is high in antioxidants.
Tea field in South Asia
Jasmine Tea Flowers
茉莉花茶 (香片)的獨特芳香 是來自混合茶葉與茉莉花花瓣,科學研究發現:茉莉花茶的香味 對人類提供鎮靜作用。  根據<歐洲應用生理學期刊>發表的一項研究:   “研究人員調查 茉莉花茶 的花香 對24個健康志願者的情緒狀態 及自主神經活動的氣味的效果。結論是: 薰衣草和茉莉花茶氣味同樣有著 平靜心情和降低心臟速率,並有鎮定作用

"Jasmine tea has a pleasant, delicate aroma. This comes from blending the tea leaves with petals from the jasmine flower. The odor of jasmine tea has been found to offer sedative effects. In a study published by the "European Journal of Applied Physiology," researchers investigated the effect of the scent of jasmine tea on mood state and autonomic nerve activity of 24 healthy volunteers. Both lavender and jasmine tea odors similarly calmed mood and significantly decreased heart rate. This calming effect is beneficial for stress-induced high blood pressure." 

參考 Reference >  http://www.livestrong.com/article/23665-health-benefit-jasmine-tea/

So lets make a loaf of bread with such unique Jasmine tea aroma !

用具:9 X 5 吋 烤盤   
We need:  9 x 5 inches LOAF PAN 

預備 Preparation:
湯種麵糊 100g(Utane dough 100g) 
高筋麵粉 250g(Bread Flour 250g) 
全麥麵粉 50g(Whole Wheat Flour 50g)
快速酵母 3/4 茶匙(Instant dry yeast 3/4 teaspoon)
香片茶包 x 2(Jasmine Tea bag x 2) 
熱牛奶 175g(Hot Milk 175g)
黃糖/ 白砂糖 {Brown Sugar (or granulated Sugar) 30g}
鹽 1/4 茶匙(Salt 1/4 tspn)
無鹽牛油(Unsalted Butter 30g)

  • 把茉莉花茶包放入熱牛奶中,沖泡5分鐘。加糖。
  • Put Jasmine Tea bags into hot milk & brew for 5 minutes. Add in sugar. 

  • 撕開茶包。茶葉倒入牛奶中。
  • Tear off jasmine tea bags.  Pour tea leaves into the milk.

  • 把所有材料放入大容器中(除了牛油外),拌勻。搓揉 至形成麵團  {CINDY Meow Meow 是不用麵包機的。你可以用手(像香港舊式麵包鋪的老師傅般,用手搓麵粉,很考功夫的呢!)搓揉成麵團;  或像 CINDY Meow Meow ,用 KitchenAid Stand Mixer (香港朋友們稱<廚師機>,用附上的勾狀攪拌頭 Dough Hook:逐漸把速度加至2或4} 
  • Put all ingredients into a big bowl (Except BUTTER), Mix well. Knead until mixture forms into a dough  {CINDY Meow Meow DOES NOT use a bread machine. So you may knead the dough by hands; or like CINDY Meow Meow,  knead by using KitchenAid Stand Mixer, with a dough hook attached:  Gradually turn the speed up to 2 or 4)}

  • 當麵團形成,加入牛油。繼續搓揉,直到薄膜(半透明膜)出現 {按此>> 薄膜是怎樣形成?};  這表示麵筋已完全形成,麵團可準備進行第一次發酵  
  • When a dough is formed, add in Butter. Knead again, until dough passes the Windowpane Test (Translucent Membranes appear)  {Click HERE for instructions of Windowpane Test};  that means the gluten is well-developed and your dough is ready for the FIRST rise.

  • 噴一些水蓋上擰乾的濕廚房紙 發酵 90分鐘 至2倍大  
  •  Let the dough complete the first rise, until it's doubled in size.  

  • 第一次發酵完成,把麵團轉移到一個乾淨工作檯,洒點高筋麵粉。用手將空氣壓出,放氣,並分成3等份。滾圓,蓋上擰乾的濕廚房紙,讓麵團在室溫下休息20分鐘    Transfer dough onto a clean floured surface. Push to remove air, deflate and divide into 3 equal portions. Cover with plastic cling wrap, let it rest for 20 minutes at room temperature.

  • 把3個麵團搓成長形然後捲起  成為一個橄欖形,  收口處捏緊。   依照捲起的順序 把橄欖型麵團搓成長條 (比烤盤長10cm) ,  3條麵團交叉 成辮子狀,  上下兩端捏緊折入底部    Roll out the 3 portions of dough with a rolling pin. Form oval shapes & then form long shapes. Form 3 long dough into WOVEN KNOT.  Place in loaf pan. Complete the 2nd round of rise, until doubled in size.

  • 麵團放入烤盤中,再發酵1小時。發好的麵團塗上一層蛋液   放入已經預熱到170C的焗爐內 烤約40分鐘,  如麵團上方上色太快, 鋪一張錫紙以免烤太焦    烤好的吐司 在架子上放涼  
  • Brush whisked egg on surface. Sprinkle pieces of Almond on top. Bake in a pre-heated 170C (340F) oven for 40 minutes (Watch closely, put a tin foil if the top turns brown quickly.  Remove from the oven and transfer onto a wire rack. Let cool completely.
Facebook Fan Page 同步發放 www.facebook.com/cindykitchenmeowmeow

參考 Reference > http://www.livestrong.com/article/23665-health-benefit-jasmine-tea/
參考 Reference > http://www.thekitchn.com/bakers-techniques-how-to-do-th-70784

2014-11-18

蘋果肉桂茶(新鮮自家制) Apple Cinnamon Tea (Fresh)

Facebook Fan Page 同步發放  www.facebook.com/cindykitchenmeowmeow
Facebook Fan Page 同步發放  www.facebook.com/cindykitchenmeowmeow

CINDY Meow Meow 的一位好友  推介了這個自家制 + 新鮮蘋果肉桂茶----混合了蘋果,蜜糖,和肉桂的氣味
CINDY Meow Meow got this amazing recipe from a friend----Apple cinnamon tea.  
It's blend of apple, sweet honey, and smell of cinnamon. 
 
蘋果肉桂茶 有助於預防感冒和流感病毒 
The tea tastes good and warm the body at the same time. 
If you drink Apple cinnamon tea often, it would help preventing colds and flu viruses. 

肉桂----具有抗病毒,抗細菌和抗真菌的特性
Cinnamon----Cinnamon has anti-viral, anti-bacterial, and anti-fungal properties 
肉桂有助對抗病毒(例如: 流感病毒),抑制有害菌(如大腸桿菌)生長
Cinnamon fights viruses (such as cold and flu viruses), inhibits the growth of 
harmful bacteria (like E. coli), and combats infections 


配料: 2個紅蘋果,肉桂條200克,蜂蜜500毫升   
Ingredients: 2 Apples (gala) , Cinnamon sticks 200g, Honey 500ml  
 
1.蘋果沖洗乾淨 如可以, 用白醋浸泡一會, 這可去掉殘餘農藥 (常用的去除殘餘農藥方法 >> 按此)
2.用濕布抺擦肉桂條。剪成5厘米長。
3.蘋果切片, 去芯。
4.將肉桂,蘋果,蜂蜜到大碗裡。混合均勻。
5.倒入玻璃瓶中, 混合。置雪櫃中, 1天後可飲 
每次倒1大匙(30ml)入杯中,加入幾片蘋果和肉桂條

 Instructions
1. Soak apples in vinegar water to wash them clean & remove pesticides residues    (Click here for proper ways to remove pesticides from fruits)
2. Wipe cinnamon in clean, damp cloth. Cut cinnamon into 5cm size.
3. Slice the apples : Cut into quarters. Please remove seeds.
4. Put cinnamon , apple , and honey into large bowl. Mix them well.
5. Place the mix in a glass bottle. Put in fridge for one day. 
 Enjoy your freshly made tea !! 
(For 1 serving>> Pour 1 tablespoon into a cup, with few pieces of apples & cinnamon sticks)

Facebook Fan Page 同步發放  www.facebook.com/cindykitchenmeowmeow 

2014-11-09

藍莓奶油蛋糕 Blueberry Pound Cake


CINDY Meow Meow 很愛很愛藍莓--含有豐富的纖維,以及維生素A & C,低飽和脂肪,膽固醇和鈉。對女士來說,藍莓也是無懈可擊的天然抗氧化劑

CINDY Meow Meow LOVES blueberries so much!!   Blueberries are rich in fiber as well as vitamins A and C, while low in saturated fat, cholesterol and sodium. For ladies, they are also a great source of antioxidants. 


自由基--是身體在新陳代謝過程中產生的一種有害物質,具有很強的氧化性,會損害細胞功能,從而加速人體衰老。女人想要抗衰老,就要及時清除體內的自由基
而藍莓中的抗氧化劑,有助於中和自由基,讓肌膚與年輕和柔軟的外觀和感覺

The antioxidants found in blueberries help to neutralize free radicals, which might otherwise damage skin cells, leaving your skin with a younger and softer look and feel. Blueberries prevent aging by providing you with many needed nutrients while providing very low levels of fat and cholesterol


Ingredients  (單位轉換計算>按這裡)

    1 杯 無鹽牛油(室溫);1 cup (250 mL) unsalted butter, softened
    1 杯 白砂糖;1 cup (250 mL) granulated sugar
  • 4 隻蛋;4 eggs
  • 3湯匙 牛奶;3 tbsp (45 mL) milk
  • 2杯 麵粉;2 cups (500 mL) all-purpose flour
  • 1茶匙 雲呢拿香精油;1 tsp (5 mL) vanilla
  • 1茶匙 泡打粉;1 tsp (5 mL) baking powder
  • 1/2茶匙 鹽;1/2 tsp (2 mL) salt1-1/2杯 新鮮藍莓;1-1/2 cups (375 mL) fresh wild blueberries

  • Preparation

    牛油﹠糖 用打蛋器攪拌至鬆發的狀態,加入雞蛋,每次加入一隻,直至完全鬆軟柔順。 加入牛奶﹠雲呢拿精油   
    (In large bowl, beat butter with sugar until light and fluffy. Beat in eggs, 1 at a time, until light and creamy. Beat in milk ﹠vanilla)
    在另一器具裡,把1湯匙的麵粉,混上泡打粉﹠鹽。 全部倒進牛油麵團中,至徹底混和
    (In separate bowl, whisk together all but 1 tbsp of the flour, baking powder and salt; stir into butter mixture until smooth and blended)

    把餘下的麵粉 與藍莓混合,倒進麵團中。 放入9- x 5吋的焗盤中, 焗約 1﹣1/2小時 (350 ºF 或 180ºC)
    (Toss blueberries with remaining flour; fold half into batter. Scrape half of the batter into 9- x 5-inch (2 L) parchment paper-lined loaf pan. Sprinkle with remaining blueberries. Scrape remaining batter over berries, smoothing top. Bake in 350ºF (180ºC) oven until cake tester inserted in centre comes out clean, about 1-1/2 hours)

    Facebook Fan Page 同步發放 www.facebook.com/cindykitchenmeowmeow

    參考 Reference >> http://www.livestrong.com/article/457861-what-are-the-benefits-of-blueberries-for-the-skin/
    參考 Reference >> http://www.canadianliving.com/food/blueberry_lemon_pound_cake.php

2014-11-08

香濃南瓜芝士蛋糕 Marble Pumpkin Cheesecake

Facebook >> Follow CINDY Meow Meow on www.facebook.com/cindykitchenmeowmeow


秋天到了 ~~Canadian Thanksgiving Day~~ 
CINDY Meow Meow 最愛的西式甜品:南瓜芝士蛋糕 
這就像南瓜批 crossover 芝士蛋糕 !多麼有意境喔! 底部用上消化餅  帶點甜味

Autumn's favourite dessert: Pumpkin Cheesecake !!  It's almost like "pumpkin pie crossover cheesecake".  Just like other cheesecake recipes, it starts with the crust >> I used McVitie's Digestive Biscuits, they are easily found in supermarket
預備時間 Prep Time: 15 minutes
烘焙時間 Cook Time: 30 minutes
總共(連雪藏)Total Time: 6 hours
Ingredients  (單位轉換計算>按這裡)
    餅乾底  Crust
  • 1 1/4 杯 消化餅; 1 1/4 cup McVitie's Digestive Biscuits
  • 1茶匙 南瓜批香料 ;1 teaspoon pumpkin pie spices
  • 1/4 杯 牛油(先溶 解);1/4 cup melted butter

  • 芝士蛋糕  Pumpkin cheesecake filling
  • 16安士 奶油乳酪 (室溫);16 oz room temperature cream cheese 
  • 1/3杯 白砂糖;1/3 cup granulated sugar
  • 2湯匙 動物性奶油;2 tablespoons heavy cream
  • 1隻蛋;1 egg
  • 1杯 南瓜泥;1 cup canned or homemade pumpkin puree
  • 1/3杯 黃糖;1/3 cup brown sugar
  • 1/2 茶匙 南瓜批香料;1/2 teaspoon pumpkin pie spices
Instructions
  1. 焗爐預熱至375°F   (Heat oven to 375°F)
  2. 把餅乾壓碎,加入香料﹠已融牛油,搞均,平均分佈於焗盤內(9吋 可拆除的圓盤) (In small bowl, mix the crumbs with the spices and the melted butter. With your fingers, press evenly on the bottom and the sides of a 9" round pan with removable bottom)
  3. 餅底放雪櫃 雪藏5至10分鐘  (Refrigerate for 5-10 minutes)
  4. 奶油乳酪﹠砂糖 用打蛋器打成乳霜狀 (In a mixing bowl add the cream cheese, 1/3 cup sugar and heavy cream. With the paddle attachment on, stir on low speed until fluffy)
  5. 加入蛋 攪拌均勻成細緻的乳酪麵糊 (Add the egg and blend well)
  6. 留起2/3 杯 的乳酪麵糊  (Reserve 2/3 cup of the cheese mixture)
  7. 加入南瓜泥 黃糖 及香料 (Add the pumpkin puree, brown sugar and pumpkin pie spices to the remaining cheese mixture)
  8. 攪拌均勻成細緻的乳酪麵糊 (Blend well)
  9. 乳酪麵糊倒進已雪藏的餅底 均勻分佈  (Pour the pumpkin cheese mixture into the chilled crust. Spread evenly)
  10. 把已留起的2/3 杯 乳酪麵糊 慢慢倒進中間 並用叉子搞拌成旋渦狀( With a spoon, drop dollops of the reserved cream cheese mixture and make some swirls with a fork or knife)
  11. 焗約 25分鐘 (Bake in preheated oven for 25 minutes or until the center is set)
  12. 打開焗爐門 讓芝士蛋糕待涼 1小時 (Turn the oven off, leave the door open and let the cheesecake to cool for at least 1 hour. Run a knife around the cheesecake for easy removal of the pan)
  13. 放入雪櫃 數小時 (Refrigerate for a couple of hours before slicing)


Facebook Fan Page 同步發放 www.facebook.com/cindykitchenmeowmeow

參考 Reference>> http://roxanashomebaking.com/marble-pumpkin-cheesecake-recipe/

2014-10-29

牛油曲奇 Basic Butter Cookies

牛油曲奇餅 Butter Sugar Cookies
Facebook Fan Page 同步發放 www.facebook.com/cindykitchenmeowmeow
第一次做 慢工出細貨 自家製曲奇 不但可以控制糖的份量 而且可以享受 從"原材料"~例如:麵粉 牛油 糖 雞蛋等等 轉化成一塊塊美味可口的曲奇餅 當中的滿足感確實難以形容 ! 今次的牛油曲奇餅我在表面印上了心心 增加美觀感 不過最想要的是貓貓形狀的 cookie cutter~ 要加緊努力尋找了 今次大約做了三十多塊 帶到朋友家中 Potluck 聚餐 大家一邊飲Martini 一邊吃曲奇餅 這個combination實在創新 !! 

First time making Butter Cookies, please note these are NOT typical American cookies (which I think they lack of appearance).  CINDY meow meow grew up eating lots of European cookies; they can be baked in different shapes.   
One thing I love home-baking is that all ingredients are in controlled.  I don't like food colour and food additives from commercial baking products.   Besides,  it is wonderful to watch all the raw ingredients turning into a final edible shape. I really do enjoy that.

As always, I am hunting for "cat-shaped' collectible items, in this case >> "Cat-shaped" cookie cutter. So please let me know if you ever come across with such cute items.
CINDY meow meow brought about 30-pcs to a potluck party. We were drinking Martini & enjoying all these yummy cookies. What a fun food & beverage combination !!

INGREDIENTS:

  • 1 杯 牛油;1 Cup butter, softened
  • 1 杯 白砂糖;1 Cup granulated white sugar
  • 1 茶匙 雲呢拿香精油;1 teaspoon vanilla extract
  • 1/2 茶匙 杏仁香精油;1/2 teaspoon almond extract
  • 1 隻蛋;1 egg
  • 2 茶匙 泡打粉;2 teaspoons baking powder
  • 3 杯 麵粉(for cake & pastry);3 cups all purpose flour

DIRECTIONS:

  1. 焗爐預熱至350°F  (Preheat oven to 350° F)
  2. 混合牛油及砂糖至鬆軟 (In the bowl of your mixer cream butter and sugar until smooth
  3. 加入雞蛋﹠兩種香精油 (Beat in extracts and egg)
  4. 在另一大容器  混合泡打粉﹠麵粉   並逐漸加到牛油雞蛋混合物裡  如果麵團變得很實很硬  把麵團從搞拌器拿到工作檯(先洒點粉)再用手搓至平滑柔軟(手要濕一點水) (In a separate bowl combine baking powder with flour and add a little at a time to the wet ingredients. The dough will be very stiff. If it becomes too stiff for your mixer turn out the dough onto a countertop surface. Wet your hands and finish off kneading the dough by hand)
  5. 用麵棍把麵團弄至1/4吋厚  再用曲奇餅模印切麵團   (Divide into workable batches, roll out onto a floured surface and cut (1/4 inch thick)
  6. 焗約15分鐘  將烤盤置於架子上,待曲奇涼透(Bake at 350 for 15 minutes. Let cool on the cookie sheet until firm enough to transfer to a cooling rack.)
Facebook Fan Page 同步發放 www.facebook.com/cindykitchenmeowmeow
參考 Reference:  http://www.inkatrinaskitchen.com/2011/12/best-sugar-cookie-recipe-and-kitchenaid_28.html

2014-10-21

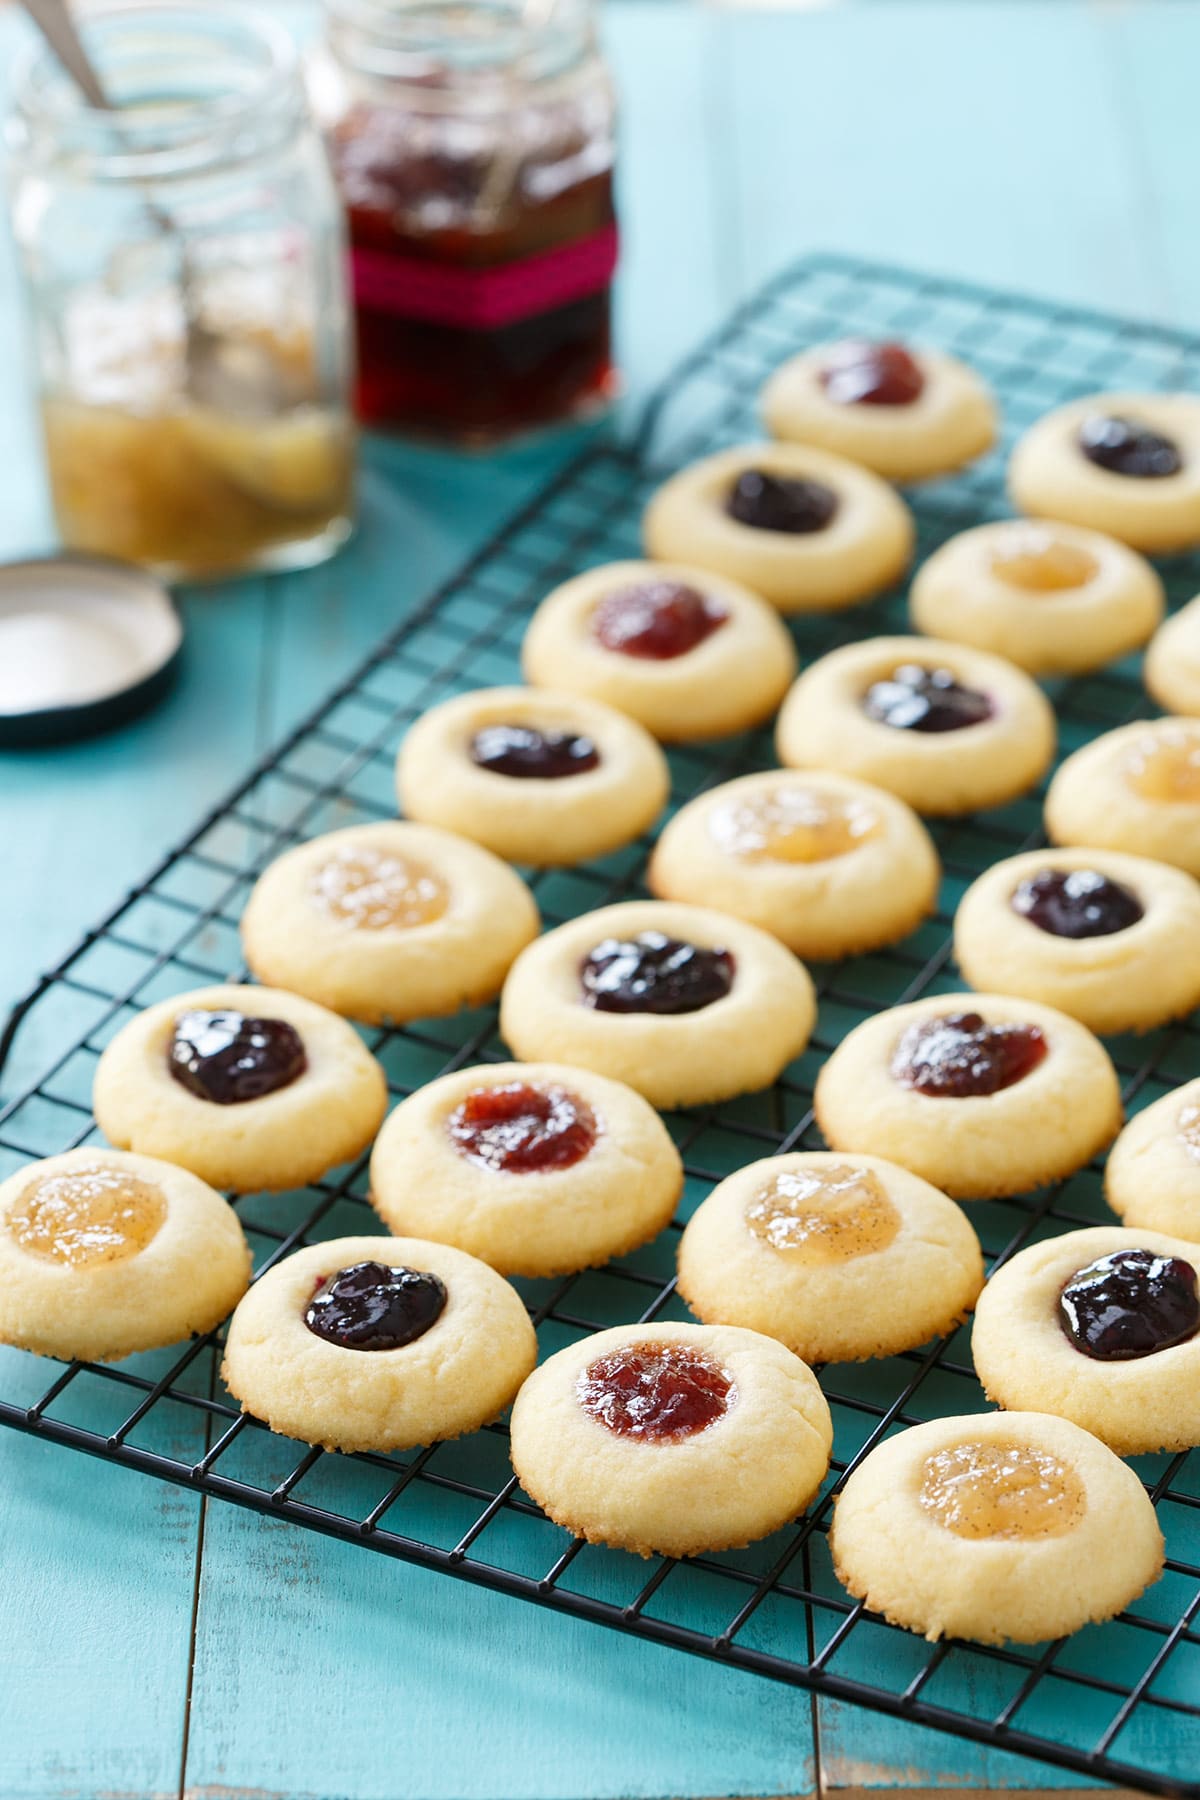
果醬牛油曲奇 Jam-Filled Butter Cookies


果醬牛油曲奇餅 Jam-Filled Butter Cookies 

可做30至40塊曲奇餅  (Make: 30 to 40 cookies)
焗 需時 20分鐘  (BAKE Time: 20 minutes)
全程需時 1小時 (TOTAL TIME: 1 HR)

材料 Ingredients:
  • 1杯 無鹽牛油 (置室溫至軟); 1 cup (2 sticks) unsalted butter, room temperature
  • 2/3 杯 白砂糖;  2/3 cup granulated sugar
  • 2 隻 蛋黃(大號); 2 large egg yolks
  • 1 茶匙 雲呢拿香油 ; 1 teaspoon pure vanilla extract
  • 2 杯 麵粉 2 cups all-purpose flour ;(You can use Cake & Pastry Flour)
  • 1/2 茶匙鹽 ; 1/2 teaspoon salt
  • 6安士果醬(不同味道); 6 ounces assorted jam

制作過程 Directions:

  • Preheat oven to 375 degrees F. Line a baking sheet with parchment paper or a silicone mat.
  • 預熱焗爐 375F  放上焗爐紙(牛油紙)
  • Beat together butter ﹠sugar with an electric mixer on medium-high speed until light and fluffy (2 to 3 minutes). 
  • 把牛油及砂糖用 electric mixer 拌勻至鬆軟(用中高速),大約需2至3分鐘
  • Beat in egg yolks & vanilla extract. Add flour and salt & mix until incorporated and dough comes together in a ball.
  • 蛋黃及 雲呢拿香油拌勻   拌入麵粉、糖  直至麵團成一球狀
  • Form dough into 1-inch balls and arrange on prepared baking sheet. Flatten balls slightly with your thumb or the back of a small spoon, leaving an indentation in the centre.
  • 用手把麵團搓成一個個圓形球狀,每個直徑約一吋    把球狀從中間壓篇(可用手指或半圓形狀的量匙)
  • Bake cookies for 8 to 10 minutes or until bottoms are just barely golden.
  • 焗 8至10分鐘 (期間密切留意 以免焗燶)
  • If indentations look shallow, further define them with the back of a spoon and then fill each with approximately 1/2 teaspoon jam. “CINDY meow meow" is using: Peanut butter, Raspberry & Orange Jam.
  • 從焗爐拿出來,如中間半圓形有反彈跡象,可用量匙輕輕再壓一壓。   加入您喜愛的果醬, CINDY meow meow 用了:花生醬、Raspberry、Orange jam 等等
  • Bake for an additional 3 to 4 minutes, or until jam melts slightly and edges of cookies are lightly golden. Transfer cookies to wire racks to cool.
  • 再焗多 3至4分鐘, 置涼
焗的中途 真的整個KITCHEN 充滿牛油香味喔  CINDY meow meow 忍不住口了! 就連 貓咪公主 (PRINCESS meow) 也要來趁熱鬧呢 !! 
YUMMY YUMMY !! CAN'T WAIT !!  "PRINCESS meow" the cat is jumping up to the kitchen counter, she's loving the smell of butter !!


Facebook Fan Page 同步發放 www.facebook.com/cindykitchenmeowmeow


參考連結 Reference>>
http://www.loveandoliveoil.com/2013/09/jam-filled-thumbprint-cookies.html

法式燉蛋 Crème Brûlée


法式燉蛋  Crème Brûlée  

是最簡單的甜品製作之一
自家制,很容易喔
並不需要 hand-mixer/  stand-mixer, 更不涉及特殊材料或工具

這樣做:把幾個蛋黃與 動物性鮮奶油 (whipping cream or heavy cream, 35%) 混在一起,
再加一點點白糖霜(粉狀),放入焗爐,攤凍,把砂糖洒在上面,高溫烤焗一會

材料 You need :
(1 1/2 teaspoons vanilla extract)
(3 egg yolks from large eggs)
(1/2 cup confectioner's sugar)
(1 pinch of salt)
  ( 1 1/2 cups heavy cream)
  ( 1/3 cup white sugar) Add later

1 1/2茶匙 雲呢拿香油
3隻蛋黃(大號雞蛋)
半杯 粉狀糖霜
少許鹽
1 1/2杯 動物性鮮奶油, 即忌廉(whipping cream/ heavy cream, 35%)
1/3杯 白砂糖 (後加)

 Yields 4 ramekins (6 once each)
這份量可做4個圓形 ramekins


1. Heat oven to 275°F
焗爐預熱275°F
2. Add the confectioner's sugar and a pinch of salt, and whisk.
把糖霜 ﹠鹽 完全混合 (工具:用Whisk)
3. Add a drizzle of the cream and whisk it into the egg yolk mixture to lighten it, then add the rest of the cream and whisk.
先加入少許鮮奶油 ﹠蛋黃,混合。 再逐漸加入餘下的鮮奶油

4. Pour the mixture through a sieve into another bowl. Add vanilla extract into the strained curd.
把混合物用篩過慮 並加入雲呢拿香精油

5. Pour the custard into 4 to 6 ramekins or oven-safe bowls and place them in a larger baking dish. Fill the ramekins as close to the edge as you can
倒入ramekin, 盡量加至接近邊緣位置
6. Place the baking dish in the preheated oven, and pour about 3 cups of boiling water into the baking dish around the ramekins.
把ramekin 放入一大焗pan, 把3杯水加入pan裡

整個過程就像燉的方式, 只是在焗爐中進行(法式燉蛋)
~~Bake for at least 50 minutes, and up to 60
~~焗50至60分鐘
~~Let them cool for 5 minutes, then refrigerate for at least 30 minutes
~~待涼5分鐘,然後放入雪櫃雪30分鐘
7. When ready to make the sugar crust, take the ramekins out of the refrigerator and dab their tops dry of any moisture or condensation.
雪櫃拿出來, 如果燉蛋表面有水份,用廚房紙輕力印乾
8. Sprinkle a fine layer of sugar over their tops. The key here is for the sugar layer to be of even thickness. Sprinkle the sugar then shake them back and forth to distribute the sugar evenly. 
輕輕洒上一層白砂糖, 均勻分佈
9. Move the top rack in your oven up as high as it will go. Place the ramekins in the oven on the top rack, and turn on the broiler. Broil for 5 to 10 minutes.  Take them out when they are golden brown and bubbling.  (Keep monitoring, to prevent over-cooked !!!)
把焗爐架移至最高,用“BROIL” 的模式,烤5至10分鐘  (期間不斷觀察, 避免烤燶 !!!)
10. It is traditional for crème brûlée to be served cold. If you like it cold, place the ramekins back in the refrigerator. They can be refrigerated for about 30 to 45 minutes before serving. Otherwise, serve luke warm.
可雪30至45分鐘,即成 傳統法式燉蛋!


Facebook Fan Page 同步發放 www.facebook.com/cindykitchenmeowmeow


參考網誌 Reference >>
http://www.thekitchn.com/how-to-make-creme-brulee-at-home-cooking-lessons-from-the-kitchn-139072